Ever find yourself juggling content and then having to set yourself reminders to publish it on time?
Dealing with a site that has frequent posts (whether created by yourself or guest posters) and working out when everything should be published is not an easy task, especially when you also need to remember to share it on Facebook, Twitter too!
Today we take a look at WP Scheduled Posts – a plugin that lets you manage your posts, when they should be scheduled and also more importantly – where!
Posting new content frequently on your website is seen as a very positive signal for Google and the other search engines. It shows you give attention to your website and partly is why they serve up your content to users over other websites in the same market as you.
Frequently updated websites = websites offering more value and information for users.
It can be anything from a monthly sales offer, new customer testimonials or perhaps helpful business advice – frequent content publishing is something everyone should do on their website to drive engagement and more visitors.
Table of Contents
- WP Scheduled Posts: Introduction
- WP Scheduled Posts: Installing the plugin
- WP Scheduled Posts: Dashboard
- WP Scheduled Posts: Schedule Calendar
- WP Scheduled Posts: Auto & Manual Scheduler
- WP Scheduled Posts: Auto Social Sharing
- WP Scheduled Posts: Missed Schedule Handler
- WP Scheduled Posts: Free vs Pro
- WP Scheduled Posts: Pricing
- WP Scheduled Posts: Final Thoughts
WP Scheduled Posts: Introduction
WP Scheduled Posts allows you to schedule your posts either automatically or via a simple drag and drop calendar – making publishing your posts easier than ever with a global overview of when things are due to go live.
With multiple ways of scheduling (manual which you can specify or auto with set times and days of the week) you can sit back in confidence knowing your posts will be up when you want them.
The plugin has been around for just over six years and was created by the popular plugin company, WP Developer (responsible for other great plugins such as Elementor Addons for Elementor and Notification X, amongst others).
Additionally, with over 7,000 active installations and a solid 4.6 out of 5.0 stars rating currently – this plugin is not only around to stay, but has a good community behind it already. Two things we generally look for when choosing a plugin for a website.
WP Scheduled Posts: Installing the plugin
You can easily install the free version of the plugin via going to ‘Add Plugins’ in your WordPress dashboard or if you’ve purchased the pro version you can visit the WPDeveloper website and download the software from there.

After you upload/install and activate the plugin, you are presented with a short five-step wizard which allows you to configure the settings for the plugin to get started straight away.
Let’s follow the wizard and configure our test site!
1. You actually skip the first step if you wish, however, if you supply your email address here you’ll get a nifty 10% coupon code off the Pro version of the plugin in return for allowing some non-sensitive diagnostic data to be sent from your site to WPDeveloper, the plugin creators.
This is quite common amongst plugin creators these days – it helps them spot trends (such as PHP version and other hosting environment settings) which helps them develop the plugin easier and also help troubleshoot potential issues via a wide array of different installation configurations.

2. In this step, we’re asked for some basic settings about the plugin. These include whether we want to show the Dashboard widget (more on that below) and whether we want the list of scheduled posts to appear across the site in our admin bar.

3. In the third step, we can choose which post types should be covered by the plugin. For example, you may wish to use the scheduler purely with your blog posts only or perhaps you have a custom post type just for events and wish to publish those via a schedule.
You can also set which users on your site have access to the scheduler. This is useful if you want to control all publishing – but it is also equally as useful if you wish for individual users to see when content is already planned to go live – and plan around them.

4. In the fourth step we can choose whether to activate the Auto Scheduler or Manual Schedular straight away – we can also set the number of posts per day we wish to publish and the start/end times of our day – useful if you only want to publish content during working hours for example.
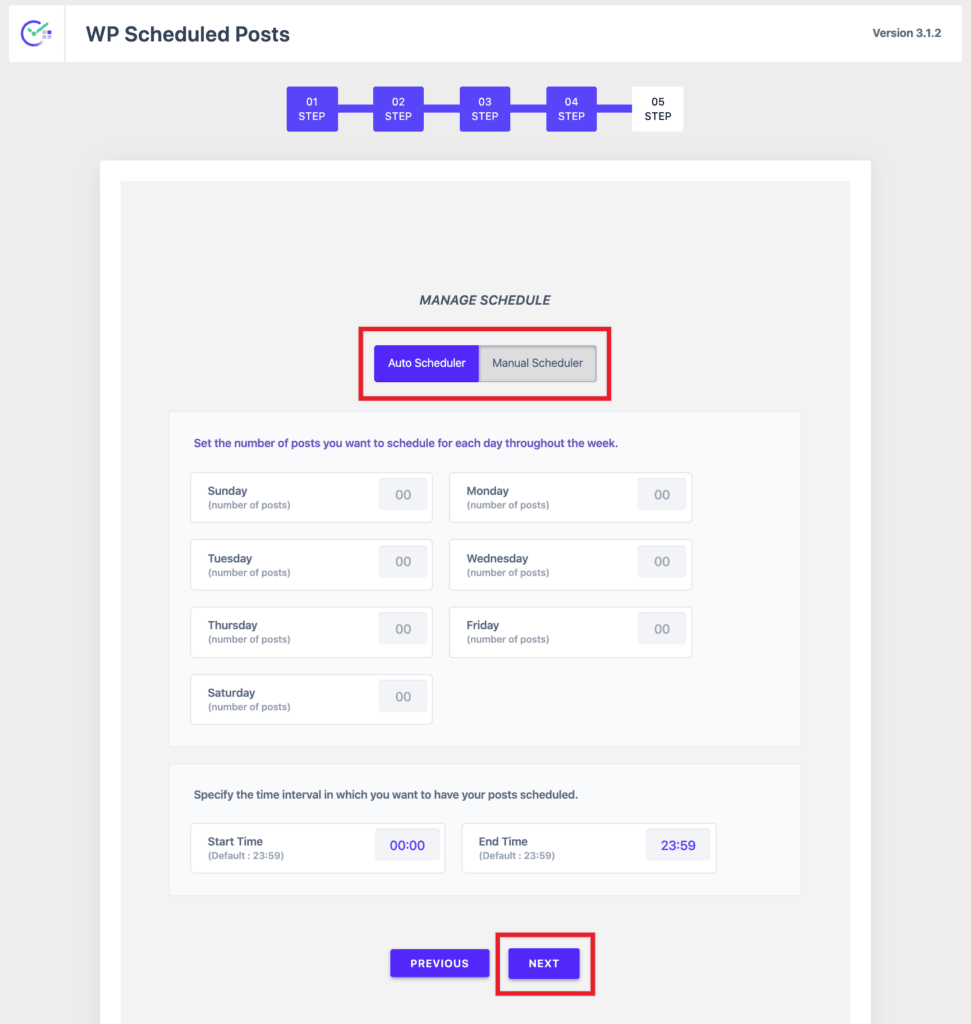
5. Finally, on the last step of the installation wizard, you can set up your social media platform integrations if you wish.
You have two choices, Twitter and Facebook.

After the wizard has been completed, you are taken straight to the WP Scheduled Posts dashboard and from here you are prompted to license your product (if you have the pro edition)
This is an important step, as registering your copy of the software with your key (found in your WPDeveloper account) will allow you to quickly update the plugin when a new version comes out by just clicking a button.

Now the plugin is installed, we are good to go!
Note: You can use the free version of the plugin to try things out and if you then upgrade, you just install the pro version with it – no lost settings or uninstalling needed!
WP Scheduled Posts: Dashboard
The main dashboard is situated within your WordPress dashboard and gives you an overview of the general settings for the plugin and also some quick links to in-depth documentation and support directly on the WPDeveloper website.

There are additional settings within each section which you can also edit either via the dashboard or when using one of the features, such as the publishing calendar.
WP Scheduled Posts: Schedule Calendar
The Schedule Calendar feature allows you to see an overview of all the posts that still need scheduling and the posts that are currently scheduled to be published on your website.
To get started with scheduling you create posts as normal in your WordPress dashboard – but don’t click publish (or set a date) – instead, just leave them in draft mode.
We created three posts and then browsed to Posts > All Posts – you can see all three are sat here in ‘Draft’ status currently.

Next, we click on the plugin submenu via Scheduled Posts > Calendar and you are presented with a calendar for the current month.
On the left-hand side are our posts that we just saw in Draft status.
To manually schedule a post on a day you want it to publish, you just drag the blue post box from the left-hand side over to the day (you can have multiple per day too).

After you have dragged them across to the days you wish to publish on you can hover over each one and perform normal WordPress tasks such as Edit, Delete or View the post.
Clicking on ‘Quick Edit’ brings up a small modal box which allows you to edit the title of the post and set the time (in a 24 hour period) that you’d like to publish the post.
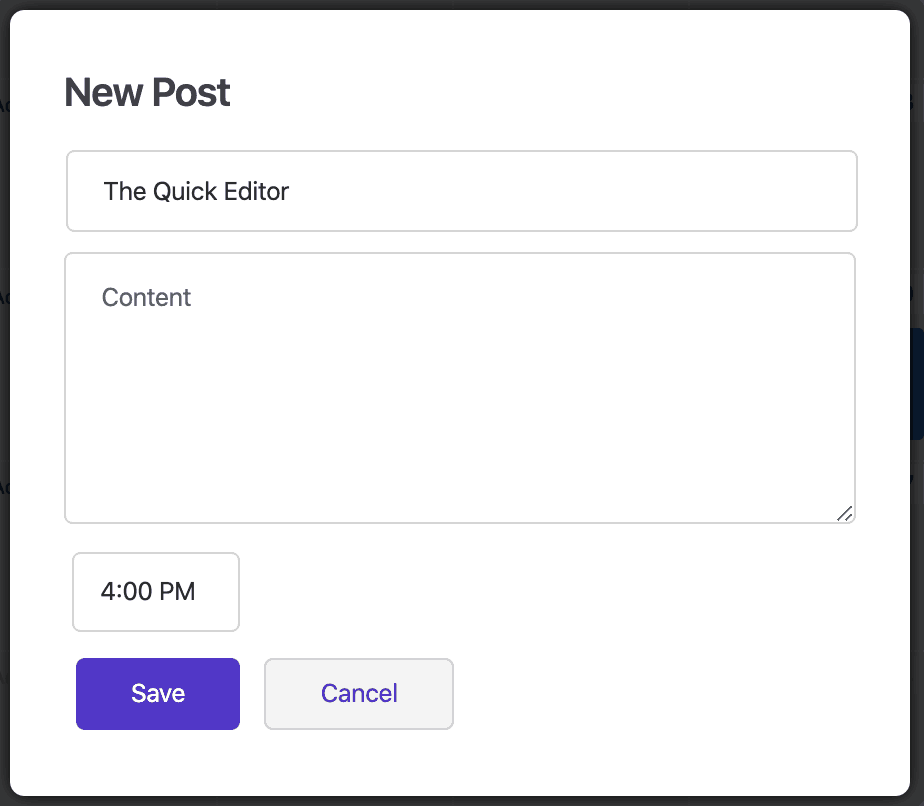
You can also start new draft posts from the calendar screen too, though for proper post formatting you will need to go into the Posts section of your WordPress dashboard.

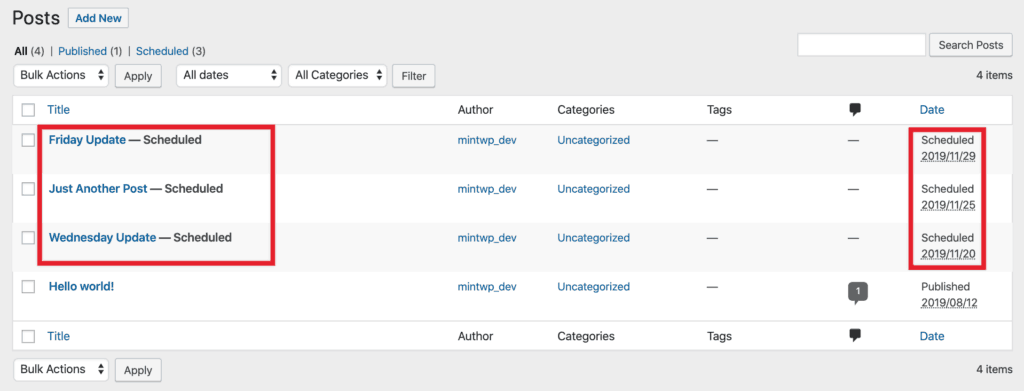
After we have scheduled our posts we browse back to Posts > All Posts and now see that our three posts have been all set ready to publish on the scheduled dates we asked for.
Additionally, if you browse to the WordPress dashboard you’ll see the WP Scheduled Posts dashboard widget with our posts lined up ready to post.

WP Scheduled Posts: Auto & Manual Scheduler
WP Scheduled Posts comes with two types of scheduling options. You can set posts to be published Automatically or Manually (via the calendar) and swap between the two if you want.
Auto Scheduler
If you have a lot of posts and don’t mind exactly when you’d like them posting, the Auto Scheduler can take over and publish them in a timeframe that suits you.

Advanced settings include setting the maximum number of posts you want to publish per day (which can be different each day, depending on how many you want your website visitors to see).
You can also set Start and End times for the Auto Scheduler – this means that you can control when posts are published, depending on the timezone your website visitors are in.
Depending on the type of site you have, you could set it to post more on Monday to Fridays and perhaps just one post per day on a weekend as an example.
The Auto Scheduler will post the set number of posts you have per day at random intervals between the two times you have configured.
Manual Scheduler
The Manual Scheduler, available via the WP Scheduled Posts dashboard allows you to set up your own schedule for posts.

For example, you could set your manual schedule to post two posts on Monday (one at 10 am and another at 2 pm), none on Tuesday to Thursday and then two more posts on Friday (one at 11 am and one at 4 pm) – this feature is great for fine-tuning when you want to release content on your website and via social media (for example a Monday morning newsletter or Friday afternoon roundup post).
Your Manual Scheduler would then look like this
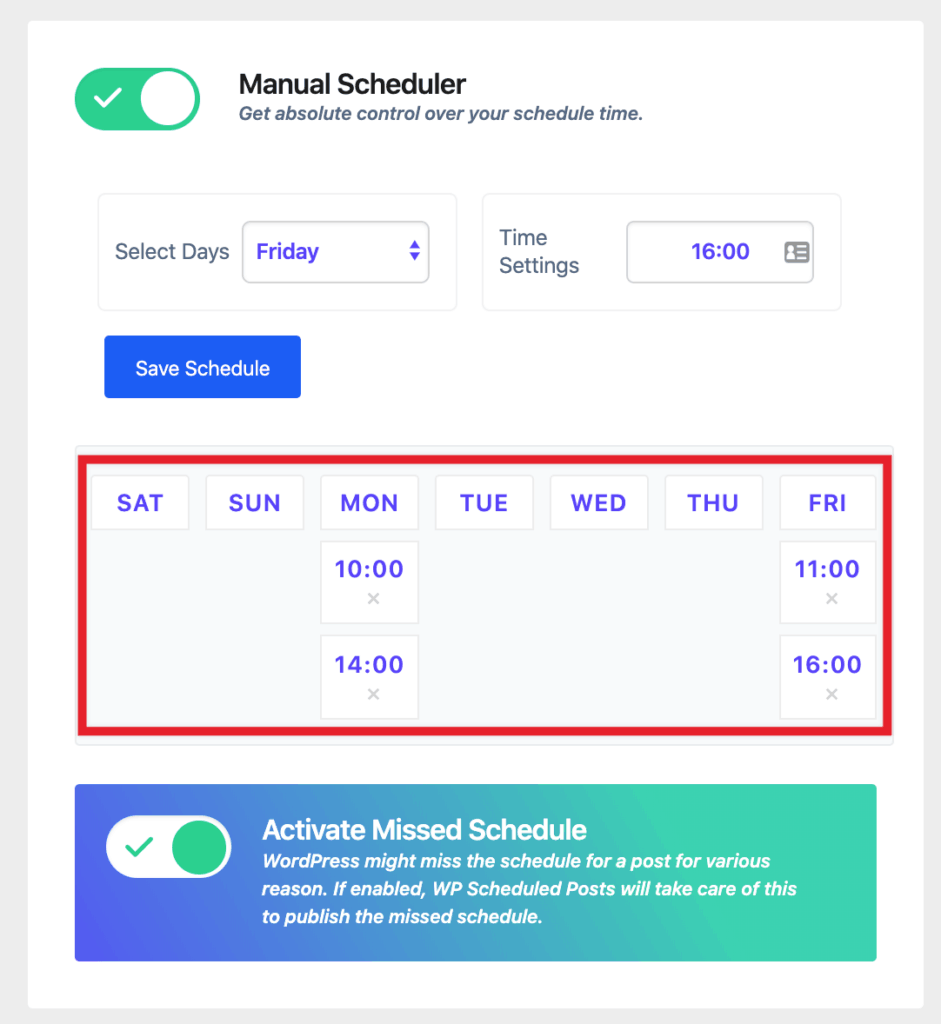
Now you have the manual schedules set up, you can edit new posts in Gutenberg or the Classic Editor and pick the day/time you want it posted.
Remember, as this is a manual schedule – the days/times are repeated each week.

This feature allows maximum flexibility when it comes to a content publishing schedule that your website visitors get accustomed to, such as our example of a Monday Morning News post.
WP Scheduled Posts: Auto Social Sharing
It is all good being able to publish content automatically (allowing you to do other tasks not on your website!) but that is only half the job really – you need to let people know you’ve published your new posts!
Integrations
Thankfully, this plugin hooks directly into Twitter and Facebook – allowing you to publish your posts not only to your site but links back to them from your social media channels too.

Setting up Twitter and Facebook integrations is a breeze – the plugin automatically has links to the exact places you need to go on each social network and there is also a link to the in-depth documentation on the plugin website if you need any further help in getting things working. It is pretty straightforward if you have ever integrated any other software into these two social media platforms.
Social Templates
One thing you’ll want to do before you automatically publish your new posts to your social media channels is set up the social templates in WP Scheduled Posts.
Navigating to the plugin dashboard and selecting the ‘Social Templates’ tab will allow us to edit what is sent to Twitter and to Facebook.

As you can see there are numerous options for both platforms – experiment with some posts until you get a look and feel that suits your usual sharing settings.
WP Scheduled Posts: Missed Schedule Handler
One great feature you don’t want to miss in this plugin is the Missed Schedule Handler.
This is useful because WordPress itself does allow native post scheduling – however, it is very basic (you have to set each post with a fixed date/time to post and there is no overview calendar either). Worse still, WordPress only checks for new posts to publish every time you have a website visitor. So, if you have a post scheduled for 9 am and no-one visits until 1 pm – it won’t get published until then!
Thankfully, WP Scheduled Posts has its own scheduler built-in and will check for any missed posts every 15 minutes for you – if it finds any, it’ll publish them.

WP Scheduled Posts: Free vs Pro
Like all good quality plugins, WP Scheduled Posts has two versions – a free version and a pro version. When it comes to working out whether you should purchase the pro version of this plugin (or any really!) – don’t forget to calculate YOUR time into the equation.
If you spent one hour a week of your time managing your post schedule, organising Twitter and Facebook posts from your website – then multiply that by 52 and whatever hourly rate you would charge a client – it soon adds up right?
We’ve covered both versions of the plugin in this article, but the free version is great to start with and get used to – you can still schedule your posts by using the drag and drop calendar feature – however, if you want to use the Auto Scheduler or post to the social media platforms automatically then you’ll need the Pro version.
Additionally, the really useful Missed Schedule Handler is only in the Pro version.

The Pro version also comes with technical support which can help you with anything from setting up the plugin to help with the social media platform integration settings.
WP Scheduled Posts: Pricing
This plugin has a range of pricing plans which will suit everyone. From individual sites at just $39 for one year (and 25% discount on renewal) to the Agency Plan which allows 100 sites for $299 (also 25% discount on renewal)

The Pro version remember allows you direct access to the technical support team should you have any problems with the plugin (or perhaps have questions about the social media integration, etc) and also allows direct updates via your WordPress dashboard with just the click of a button.
WP Scheduled Posts: Final Thoughts
Content is what the web is all about – tools like WP Scheduled Posts help you take back some of your time by allowing you to schedule things in advance and making sure you are publishing content evenly to allow visitors to see it.
Having content pre-written and scheduled to drip out on to your website is much better than publishing all your new posts on one day, as your visitors may miss your social media posts if they are all done at once. The same goes for your posts, visitors may check your site to see the latest post and if you just published five in a day then they may miss some!
With the Auto and Manual Schedulers, you can really define exactly how you want your content publishing to be executed and by scheduling content in advance, it frees up your time to do other things too.
We especially love the fact the plugin works with custom post types – this is great for scheduling event type posts which may happen monthly or seasonally or you could drip feed out content to members by combining this plugin with another one.
Have you used this plugin or think it would suit your type of website? Let us know in the comments!

