Email marketing.
To date, still the biggest return on investment you can get for your money when it comes to online marketing. Many people swear by social media platforms – but if your customer isn’t on that platform or around when you publish your post, it can get easily lost and they’ll never see it. Email, on the other hand, is still as popular as ever today for marketing.
Whether you sell products on your site, take bookings for services or perhaps just want to keep in touch with people who frequent your site, you’ll need their email addresses to do so.
WordPress doesn’t offer a native way of collecting email addresses, but there are a host of options out there which range from service-based websites where you install some code on your website to WordPress plugins that let you control everything straight from your WP dashboard. One that stands out from the pack is the WordPress plugin MailOptin.
Table of Contents
- MailOptin: Introduction to MailOptin
- MailOptin: Installing the plugin
- MailOptin: Dashboard
- MailOptin: Integrations
- MailOptin: Campaigns
- MailOptin: Running an A/B Split Test
- MailOptin: Lead Bank
- MailOptin: Email Automations & Newsletters
- MailOptin: Statistics Dashboard
- MailOptin: Free vs Premium
- MailOptin: Pricing
- MailOptin: Final Thoughts

MailOptin: Introduction to MailOptin
MailOptin comes in two forms – a free version (just add via the native ‘Add Plugin’ in your WordPress dashboard) and a premium version, available to purchase via the MailOptin website.
What does it do?
This plugin allows you to collect visitor email addresses (and more) on your website via different campaign methods that you create directly from your dashboard. It offers several themes which you can style to match your current website and compliment any pages.
It allows you to send the collected email addresses directly to your email marketing/CRM platform of choice and additionally, create automated weekly/digest emails when you publish a new post too if you want.
It offers six distinct types of campaigns, which can be seen below.

Who is it for?
Anyone with a WordPress website and we mean anyone!
If you want to stay in contact with your website visitors, then the best option is to email them. You can control the marketing message that they receive and you can also segment your customers for the best engagement (for example, those that have signed up for more details, but not bought yet vs existing customers).
Good email marketing starts with valid data and from participants who WANT to be emailed (i.e. have filled out a form on your site). These days it isn’t even considered bad practice to email people from random lists, it is actually against the law in many places around the world.
MailOptin allows you to collect email addresses from visitors who want to stay in touch with you. This way, you can build up a great email list to send out news, updates, offers and marketing campaigns as needed to them.
Installing the plugin
The plugin can be easily installed via ‘Add Plugins’ in your WordPress website or, if you’ve purchased the premium option you simply download it from the MailOptin website.

If you’ve already installed the free version you need to deactivate and delete it from your website (don’t worry, it won’t remove any of your existing settings or campaigns) and then upload the premium version from your desktop.
After a quick install, you are presented with the following screen where you need to put your license key in. This will allow the plugin to check for any updates and allow you to update it automatically without having to download it each time from their website.

The free version of course once installed allows automatic updates like other free WordPress plugins do.
MailOptin: Dashboard
The dashboard is the place for the main plugin settings (not campaigns), these include:
- Optin Settings – you can disable the impression tracking here if you wish and set global cookies expiry dates to run across all your campaigns
- MailOptin Affiliate Link – earn a little extra by showing a MailOptin link on your campaigns
- Email settings – this is where you can put in the details of what email address emails originate from (for example if you wish to send a notification email to yourself on each signup)
- Lead Bank – enable or disable the Lead Bank feature (more info on this later)
- reCAPTCHA – this plugin works with Google reCAPTCHA v2 and v3 – just enter your authentication keys

MailOptin: Integrations
One of the most important things a lead generation plugin needs to do is to integrate into your email marketing platform of choice. Many lead generation plugins offer a few common integrations such as MailChimp or Constant Contact and usually Zapier for the rest.
MailOptin, however, offers 22 email marketing platform integrations by default plus direct integration into Google Analytics (for impression/event tracking) and also 2 CRM platforms (HubSpot and Ontraport) – this is many more than your usual plugin and allows you maximum flexibility.
Additionally, you can also add more than one integration at once if you need to send data to different platforms.
Aside from supporting the major platforms such as ActiveCampaign, ConvertKit and MailChimp they also cover some of the other popular email marketing platforms too and, as a bonus they also support Elementor the page builder – allowing you to drop a campaign widget easily into any page you design.

Setting up an integration is easy, just click on MailOptin > Integrations and then choose from the list the email marketing platform you use.
In this example, we’ll use ActiveCampaign. After inputting our ActiveCampaign API URL & Key it performs a quick connection test and informs us it is now connected.
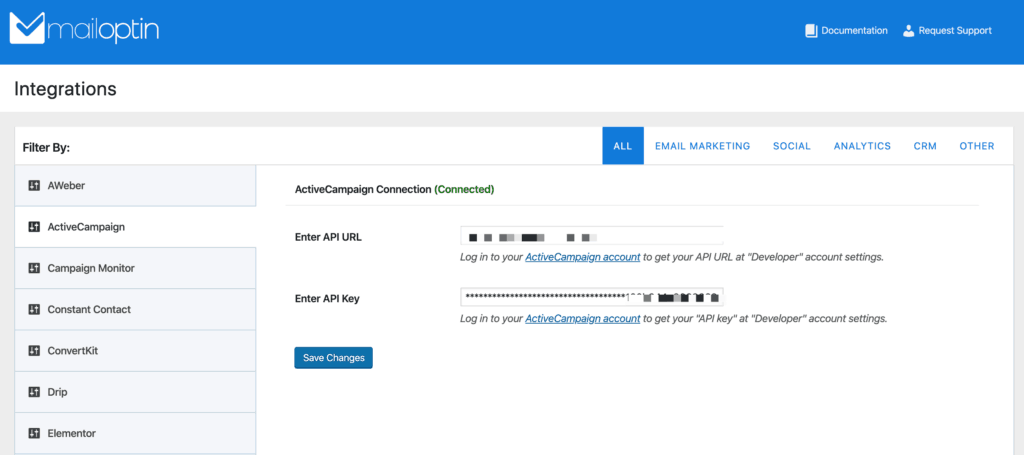
You can repeat this method for each platform you wish to integrate.
You can also enable the Google Analytics tracking in this section too if you wish to track conversions and events directly into Google Analytics.
MailOptin: Campaigns
Now we are at the heart of what this plugin is about, campaigns. You can run multiple campaigns at any time with MailOptin – and you have several different options available, these include:
- Lightbox – a popup in the middle of the screen
- In-post – a block that will show between paragraphs or in a place you determine on a post/page
- Sidebar/Widget – a widget that will show on your site sidebar or wherever you want it to show
- Notification Bar – a horizontal bar at the top or bottom of your site
- Slide-In – a box that will slide in from any direction in one of the four corners of the screen

Creating a campaign
Creating a campaign is as easy as the following steps:
1. First, we navigate to the MailOptin main dashboard – which shows us our campaigns and basic statistics.

Before we create our campaign it is worth mentioning that MailOptin comes with some free and premium themes depending on what version of the plugin you have.
In the premium version of MailOptin, you can choose from:
- Lightbox – 12 themes
- In-Post – 12 themes
- Sidebar/Widget – 11 themes
- Notification Bar – 3 themes
- Slide-In – 10 themes
Whether you have the free or premium version, you can customize the look and feel of the themes provided to match your website look and feel.
2. Clicking ‘Add New‘ brings us to the campaign creation screen. From here you can browse all the templates for each type of campaign you can create.
Then, simply pick a name for your campaign (in this example we’ve called ours ‘Blog box’) and then click ‘Select Theme‘ to start the customization process.

3. The next screen is the campaign customizer. It has the familiar look and feel you’ll be used to when editing your theme settings in WordPress. A preview is shown of your campaign at all times in the main area of the screen.
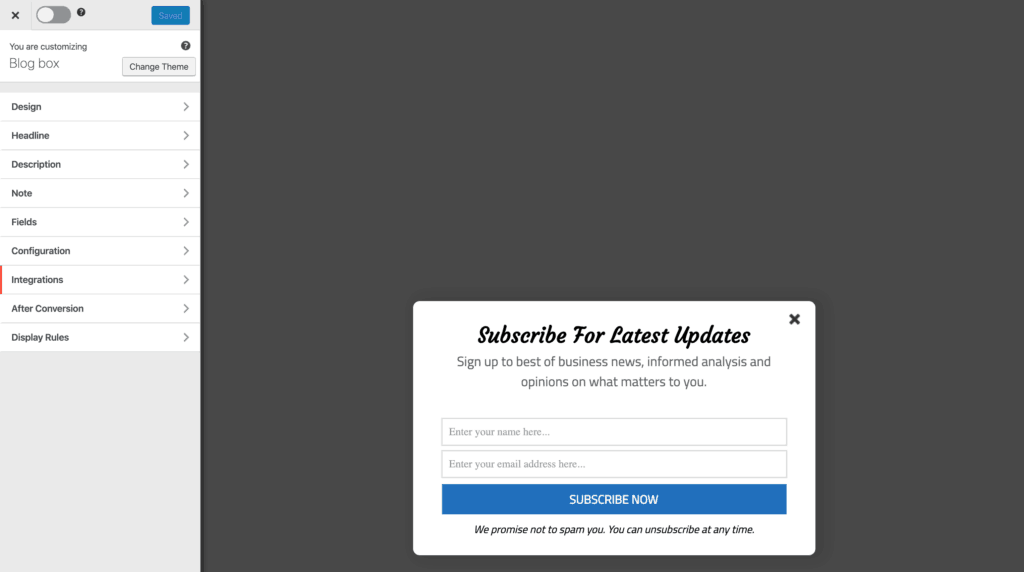
4. There are nine sets of configuration options available for your campaign and within some option screens there are further settings available too – you can customize your campaign to exactly your needs.
In the first configuration screen ‘Display’ you can set how you want your campaign to appear on the screen when a user sees it. Trying each option allows you to preview exactly the display effect in realtime.

5. Next, you can edit the text for the Headline, Description and Note section of your campaign. Each one allows you to choose the font settings in detail or hide that section completely.

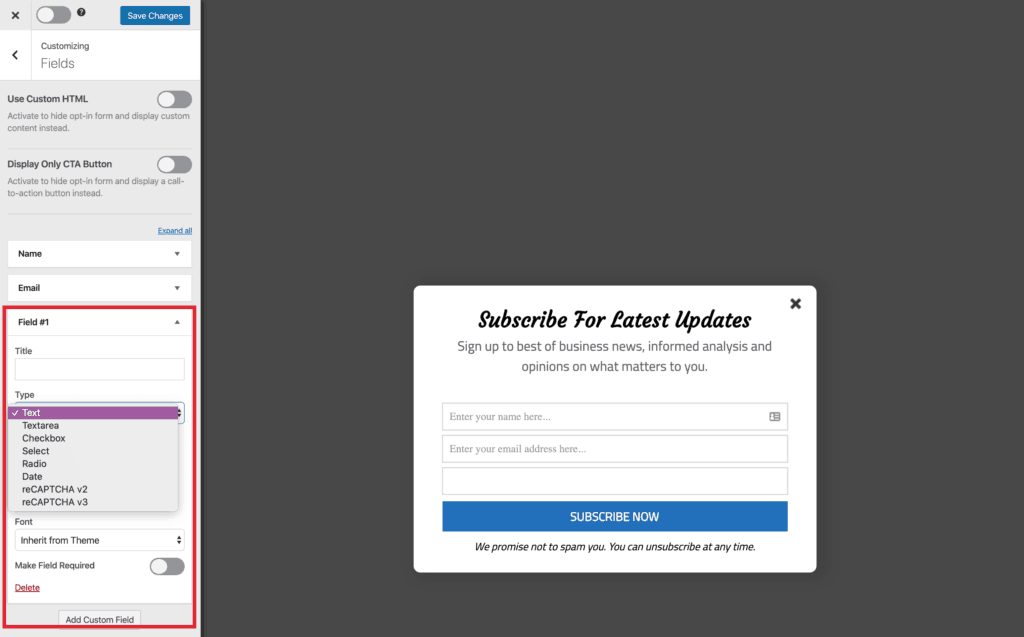
6. The next options we will look at are the ‘Fields‘. Here, you can set which fields you wish to display on your campaign. Most people will only want a name and email address for their email marketing platform – but if you wanted to collect further information (for example, date of birth, country) then you can add this option here.
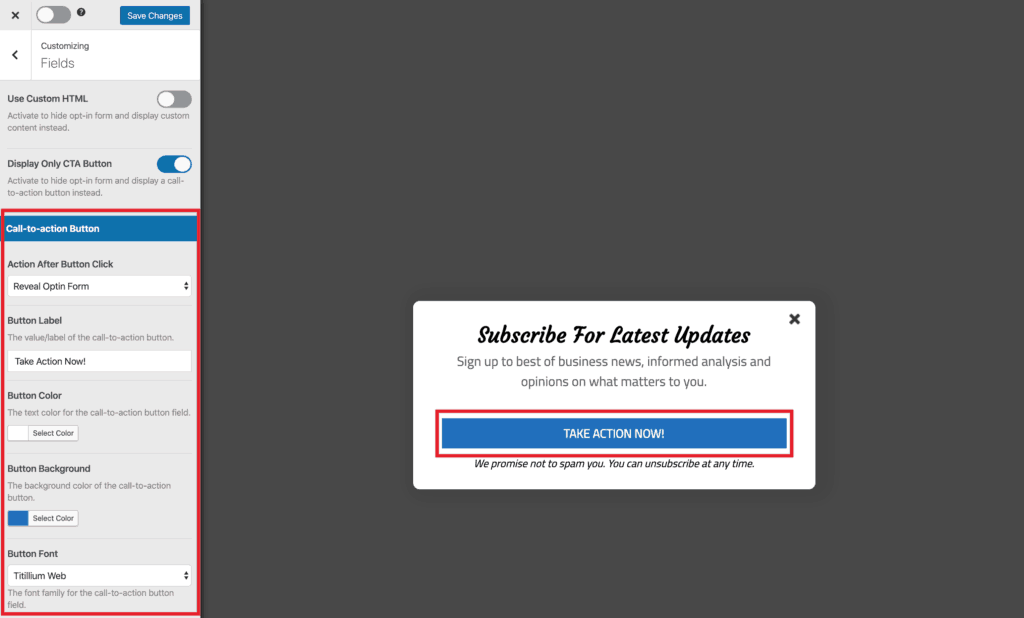
7. Another great option available, if you have several fields is the ‘Display Only CTA Button‘ switch. This changes the campaign display to load a smaller display to your website visitors – perhaps your form with five fields isn’t converting as well as it should, but by hiding the fields behind a good CTA (call to action) users may click through and then subscribe.
8. Next, we have the ‘Integrations‘ options. Here you choose your email marketing / CRM platform that you want to send the user data to. Simply select the integration you added from the dropdown selector when you installed the MailOptin plugin.
Here we choose the ActiveCampaign connection we made earlier and it prepopulates our email lists from the email marketing platform. We have chosen ‘Newsletter‘ as our list and then added a tag of ‘blogsignup‘ to be applied to each user that signs up to our list via this campaign – ideal for tracking and segmenting your emails when you send them.
You can choose multiple tags if you wish and you can also map the custom fields to your list too. For example Date of Birth or Country Location for example.
If you have a form set up in ActiveCampaign, it will allow you to pick that form too and will execute the optin method for people that signup.

9. The next option you configure is labelled as ‘After Conversion‘ – this is what happens to your campaign after a user has successfully entered their information. You can choose to display a simple success message, redirect to a new page or and have the option to send an autoresponder to the user immediately and notification to yourself if you want.
You could use this method if you want to give someone a free eBook or download only if they give you their contact details for example. This would be done by simply creating a hidden page on your site which the campaign will redirect to after the user has given you their details – easy!
For conversion tracking (useful if you are running a paid advertising campaign) you can add details to make sure your user who just entered their details is linked to your pixel or retargeting script at the same time they submit their details.

10. Finally, we have one of the most important settings in any lead generation campaigns. That is the ‘Display Rules‘.
This is a section you should spend a lot of time on. It is really important to set when exactly a user should see your campaign.
For example, you may wish to show a small slide-in box on every one of your blog posts, to allow users to signup and get your latest posts by email (hint: that is what we offer on our own blog here – check out the bottom left!) – but that campaign may well be seen as intrusive on the rest of your website, where it may cover important information such as pricing or product information.
MailOption offers a staggering thirteen different display rules for you to choose from – the most we’ve seen in any lead generation plugin and allow you to refine your campaigns down to the minute detail. You can use one or multiple rules to display your campaigns.
Good display rules we suggest for example are:
- Display a campaign when a user moves their mouse away from your page (ie, to the taskbar) – this is called ‘Exit Intent’
- Display a campaign after a user has sat on your pricing page for three minutes without doing anything – perhaps a discount code or option to call you for some sales advice
- Display a campaign slide-in on your blog posts to offer email updates when a new post comes out
- Display a site-wide notification bar for when you have a sale or special offer on
- Display a custom campaign based on ‘Referrer Detection’ – has a user come from one of your partners? Perhaps tailor a campaign specifically at them.
- Display a campaign aimed purely at mobile or desktop users.
- Display a campaign only on weekends or evenings.
The options are endless as you can see and remember you can have as many campaigns running as you wish. They’ll only display based on the display rules you set up – absolutely make sure you test test test so that you aren’t bombarding users with multiple campaigns – that can be an annoying user experience and you’ll end up with a very low conversion rate!

11. After we’ve finished creating the campaign we need to save our changes using the marked ‘Save Changes‘ button and use the toggle switch to enable it on our website.

Setting up a campaign is as easy as that – you can repeat the process for multiple campaigns depending on what you want to achieve in each section of your website.
After testing our campaign with our display rules and submitting our information we head over to our chosen email marketing platform (ActiveCampaign in this instance) and see the user record has been created, along with the correct email list and ‘tag’ we asked to assign them.

When it comes to creating tags we suggest either using a tag that relates to where the campaign is being shown i.e. ‘blogsignup’ or using the same name as the campaign – that way you can track people in your email marketing platform easily.
Embedded or Before/After Post Campaigns
If you choose one of the Embedded/Inline or Before/After post-style campaigns you’ll be able to configure the campaign to show before or after every post automatically, even down to only certain post categories or authors if you wish.
Additionally, you can create a specific campaign and then just use the embed feature (via a Gutenberg block or Elementor for example) to add that campaign to just one post or page that you have created.
Campaign Dashboard
Now we have a campaign set up, our campaign dashboard displays it, some basic statistics and we can also take several actions as highlighted.
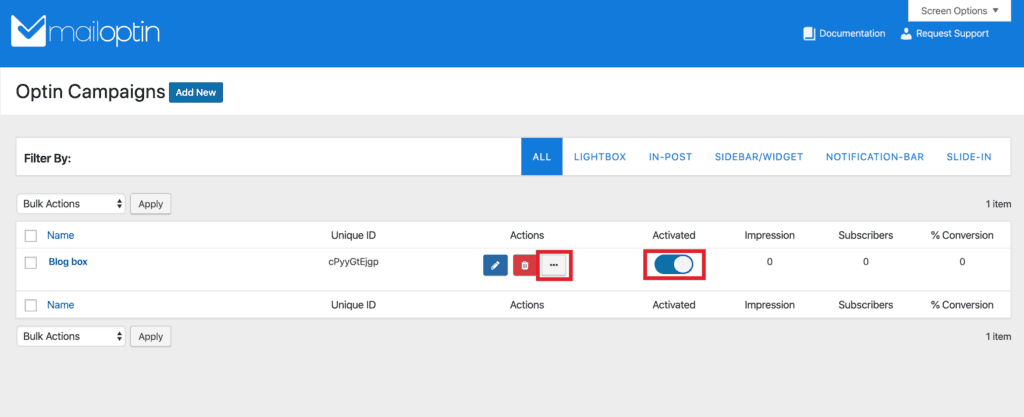
If we click the three dots we’re given a small menu with several actions available to us which include:
- A/B Split Test – for testing out different variations of your campaigns
- Duplicate – this makes a carbon copy of your campaign for you to work on
- Enable Test Mode – this makes the campaign display immediately on your site and ignores the Display Rules – great for testing – but do not forget to turn it back off – as site visitors will also be part of the test!
- Reset Analytics – if you’ve made changes to your campaign or run a few tests through it, you may wish to reset the analytics to zero again to see how the campaign performs in the real world
- Clear Local Cookies – you should run this before and after Test Mode so that you can see your campaigns on your site as a normal user would.

MailOptin: Running an A/B Split Test
One of the great features with MailOptin is the ability to run split test campaigns. This is basically where you set up two copies of a campaign – with one perhaps with different text or design than the first version of your campaign and the plugin automatically runs them side by side as people visit your site – showing one or the other at random.
You can then see which campaign converts better and choose that one – even repeating the process to keep fine-tuning your campaign for maximum conversion rate.
1. First, we click the button with the three dots on the campaign we wish to run the A/B split test on. Then select ‘A/B Split Test‘
A small modal box appears where we can give a name and note for this test – this lets us know what we changed for future reference. For example, we may wish to change a font or colour.

2. After clicking the ‘Create Split Test‘ button we’re taken into the Customizer again, this time with an exact duplicate of our campaign but with our new variation name at the top.
Here you can make the changes to the new variation.
We recommend you don’t make too many changes otherwise you won’t be sure exactly what is and isn’t working when it comes to converting users! Make some small changes and keep running new tests to work out what works best on your website.

3. After making our changes, we hit the blue ‘Save Changes‘ button and exit back out to the MailOptin Campaign dashboard.
You’ll see from the updated dashboard we have multiple new features on display. First, we can see the variation of our campaign clearly underneath our main campaign – and a new symbol next to it ‘A/B‘ has appeared.
Next, we have the option to add another variant of the campaign via ‘Add Variant’ if you want to test a third version. You can also pause the test at this point or, after enough statistics (as shown on the right-hand side) you can choose the ‘End & Pick Winner’ button if you are satisfied with which variant is converting better for you.

4. When you are happy with the better variant and you click the ‘End & Pick Winner’ button a small dialog box appears. Here you click on the variant you want to use and it will delete the non-performers automatically for you.

As we’ve already said – keep on testing until you find the perfect campaign that converts. Depending on your traffic, you may wish to leave some tests running for a few weeks before you pick a winner – the more data you have collected the better decision you can make.
MailOptin: Lead Bank
The MailOptin Lead Bank can be turned on/off for each campaign you run and lists the leads that you have collected via each campaign.
This interface allows you to take a quick glance at new entries instead of looking in your email marketing platform. You can see important information such as the fields filled in, what browser/OS they used, the page they converted on and the time/date it happened.

You can export leads (in CSV format), delete them and search within them too. Great for a quick overview of what data your visitors are submitting and also useful for troubleshooting in case you’ve not mapped fields correctly to your email marketing platform or CRM system.
MailOptin: Email Automations & Newsletters
One of the interesting things this plugin has, is the ability to send out a digest or per-post email to your subscribers.

You can create a suitable template, which the software will automatically populate with either a digest of your most recent posts or your latest post and then it will send out an automated email based on the preferences you give it.
This can save you significant time each week in creating an email digest. To create one, we just follow these steps:
1. First, we navigate to MailOptin > Emails. This is our Emails dashboard, showing us what Email Automations and Newsletters are set up, plus a log of previously sent emails. Click ‘Add New‘ to get started.

2. Next, we are given the option to choose an Automation Title and Email Automation type.
In this example, we’re going to create a weekly posts digest to send out to our subscribers and we’ll use one of the templates that comes with the MailOptin plugin.
After choosing the Automation Title name and ‘Posts Email Digest‘ as type, we click on ‘Select Template‘.

3. We’re automatically taken into the familiar customizer-style editor. Here we can see a series of options on the left-hand side and a preview of what our Posts Email Digest looks like.
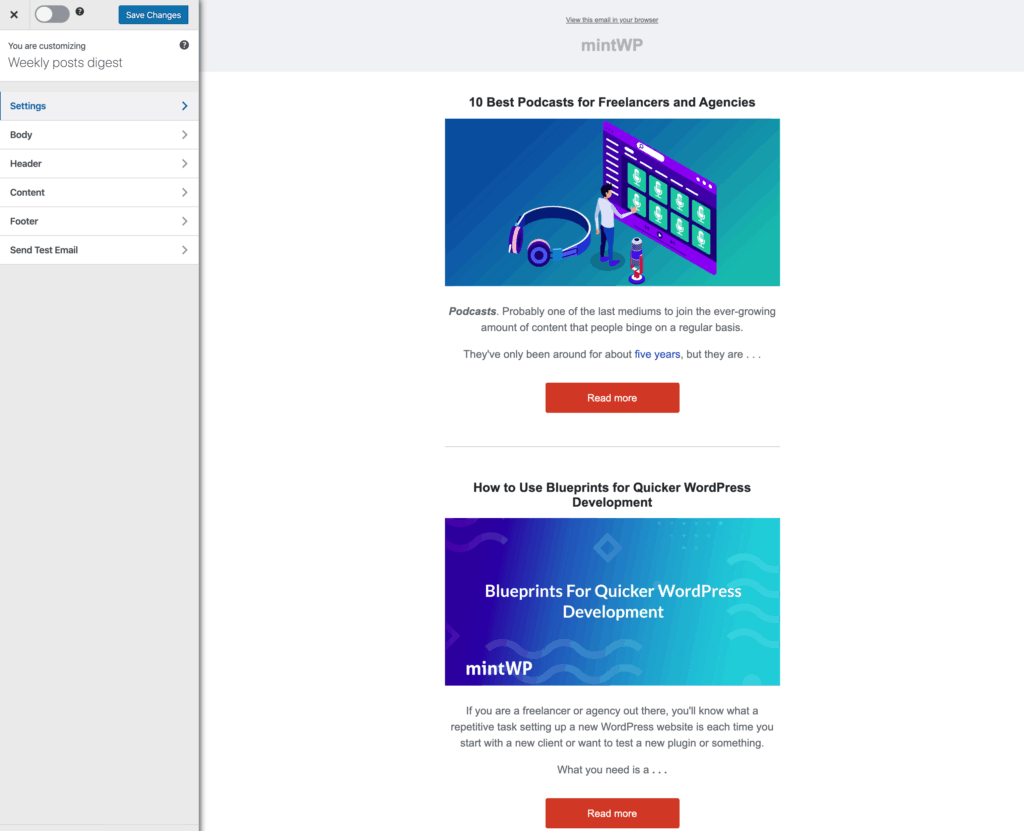
4. The option sub-menus on the left-hand side allows you to style the email that will be sent out and also filter the posts that you want to be included, for example, you may only want to send posts written by a certain author or category type.
You can also set the email marketing platform and list you’ll send the emails to and of course, on a schedule which will suit your readers.

Once you’ve set up your Email Automation or Newsletter, you can choose to send a one-off test to see what it looks like. You just put in the email address you wish to send it to and hit send. Otherwise, your campaign is now set up to send out as you have scheduled it.
MailOptin: Statistics Dashboard
We’ll admit to being quite ‘stats freaks’ if you will – we absolutely love statistics. But, there is a reason! If we spend all this time creating and perfecting campaigns – it is really important we work out if they are actually doing their job and working for us 24/7 (and by that we mean, converting visitors to signing up to our email list!)
Thankfully, the MailOptin Statistics screen gives you plenty of statistics to look at, here is our example from our test.

You can see an overall view of how all your campaigns are running across your website, or by a specific campaign. There are options to ‘Refresh Analytics‘ to get the latest update and also ‘Clear Stats‘ to reset everything to zero.
On the right-hand side, you’ll see your best performing campaigns. Note: If you see numbers in brackets without a campaign name next to them, this is because you have deleted that campaign!
Scrolling further down the Statistics dashboard you’ll see separate charts for Impressions, Subscribers and Conversion Rate per day too.
MailOptin: Free vs Premium
MailOptin comes in two versions, a free version that is widely available to install via your WordPress dashboard and a premium version, which is available to purchase via the MailOptin website.
To start with, you can install the free version and create a new campaign from a limited number of templates (there are many more in the premium version) and you can customize that campaign too.
The free version does limit you with regards to the ‘Display Rules‘ you can either set your campaign to run on the site globally or individually named pages. However, if you wanted a campaign to show to every user on every page of your website, then it will do just that for you without a problem whilst you get the hang of things.
Just to recap – here is what is and isn’t available between the two versions:
- Integrations – all available in both versions apart from Google Analytics in premium version only
- reCAPTCHA – premium version only
- Email Automations / Newsletters – single automation / limited settings in free version
- Themes – 7 free – 28 in premium version
- Campaigns – Slide-In / Notification Bar in premium version only
- A/B Split Test in premium version only
- Lead Bank – premium version only
- Statistics Dashboard – premium version only
The MailOptin website offers a substantial documentation section, giving you some great walkthrough guides, tips and howtos when it comes to setting up a campaign, configuring it and managing your integrations.

That said, the premium version also comes with technical support, which means if you don’t know how to do something or you get stuck with your own or a client’s website – you can just email them for help and they’ll be back in touch with a solution quickly for you.
MailOptin: Pricing
MailOptin offers three different pricing models (and a lifetime option!) for the premium version of the plugin.

If you just want to run campaigns, collect email addresses and then use your email marketing platform to send out any emails (newsletter or automated) – then you’ll just need the Standard license. If you have multiple sites or wish to use the Email Automation / Newsletter functions of the plugin, you should opt for the Pro license.
Finally, if you are a Freelancer or Agency, we’d recommend the Agency license – allowing you to install the full premium plugin on an unlimited number of sites – each allowing quick and easy updates via the dashboard.
MailOptin: Final Thoughts
MailOptin is a well-rounded professional plugin from a company that offers great documentation, fast support and updates to its software.
If you are serious about collecting your website visitor email addresses for use in email marketing – then you won’t find an easier lead generation plugin than MailOptin.
The smart user interface allows you to set up campaigns and variants of them easily and get them up and running on your website quickly. The fact everything is done from the WordPress dashboard and not a third-party website is also a bonus as it saves loading external scripts and adding potential load time to your webpages.
We especially loved the many deep integrations and the number of Display Rules which allows you to customize your campaigns to exactly how you want them to run.
Check out the links below to see more details about the plugin and let us know in the comments if you use MailOptin!


